
dbt Integration with FlexIt
FlexIt integrates with dbt Cloud or dbt CLI to enable 100% metadata-less BI with the best of dbt
- Data Lineage
- Exposures (Dashboard dependencies)
- Joins (Entity Relationships)
- Metrics
- Data freshness
- Data dictionary (Docs)
- Statistics
- Custom
metafor formatting, synonyms, business names, joins, time grain and more
Example dbt Project
The dbt-business-intelligence github repo provides a great dbt project to highlight BI integration.
Getting Started
Check out this video to see how a Business Intelligence integration with dbt can enable 100% metadata-less BI
This guide assumes that you already have a dbt environment set up, and a FlexIt Analytics instance running. If not, or if you'd like to learn more about either FlexIt or dbt, then check out the links below.
Check out the FlexIt docs or get FlexIt
Connect to your data warehouse
Required
You need to create a data source connection in FlexIt that will connect to the dbt project databases. dbt holds metadata, but that does not include database connection details.
Connecting to dbt
If using dbt Cloud, you need to enter a Service Token into the dbt integration under Administration > Configuration > Integrations, detailed in the Administration Guide.
If using dbt CLI, you can connect to a Docs server or manually upload manifest.json files found in the /target directory of your dbt project.
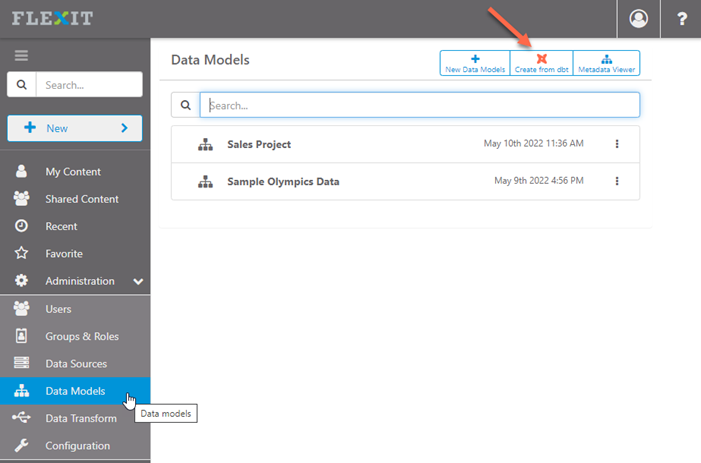
From the FlexIt Administration panel, select Data Models on the left and then click Create from dbt on the top-right, then select the type of connection to dbt. Read more about data models in the Data Modeling guide.
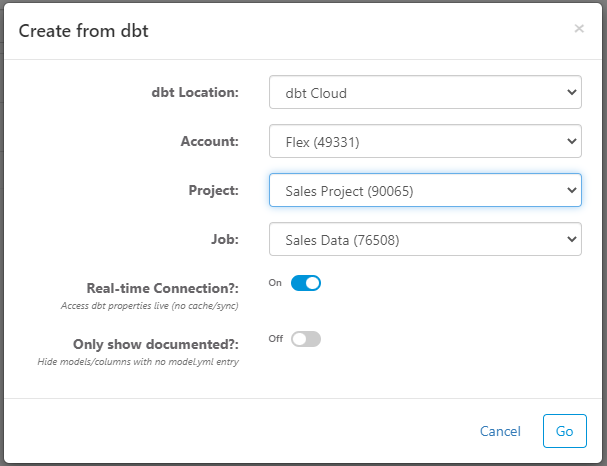
dbt Cloud
With a Cloud API service token configured, simply select Account, Project, Job and configure the following settings:
Real-time Connection - enable this to have a live connection to dbt Cloud. If you update a model and run the job, then changes will automatically persist to this FlexIt data model. If real-time connection is disabled, then the FlexIt data model is initially built (seeded) from the dbt metadata, but then you can change the metadata locally in FlexIt. However, this may lead dbt and FlexIt to be out of sync.
Only show documented - enable this to only show models and model columns that are documented in
YAMLfiles.
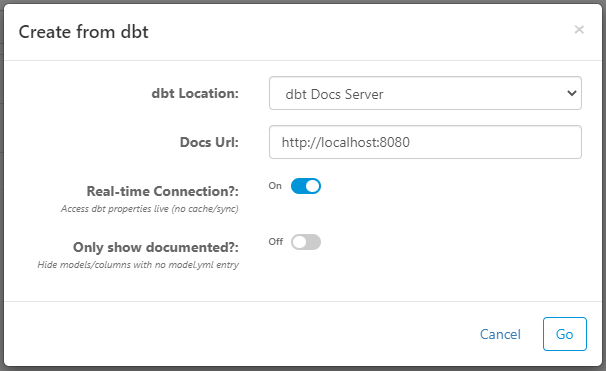
Docs Server
Enter the base URL for the docs server and FlexIt will automatically source manifest.json, catalog.json, and other artifacts from the docs server. Then, configure the following settings:
Real-time Connection - enable this to have a live connection to dbt Cloud. If you update a model and run the job, then changes will automatically persist to this FlexIt data model. If real-time connection is disabled, then the FlexIt data model is initially built (seeded) from the dbt metadata, but then you can change the metadata locally in FlexIt. However, this may lead dbt and FlexIt to be out of sync.
Only show documented - enable this to only show models and model columns that are documented in
YAMLfiles.
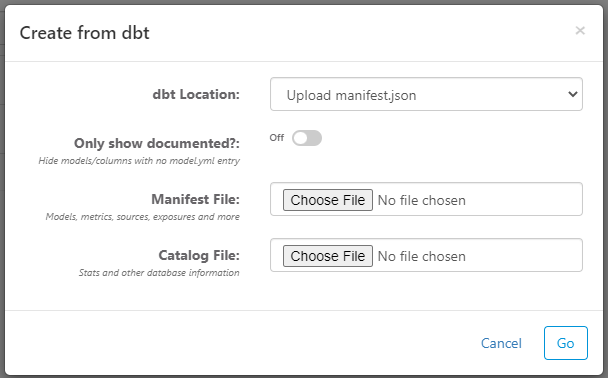
Upload Manifest
Manually upload the manifest.json and catalog.json files from your dbt project target folder. Then, configure the following settings:
- Only show documented - enable this to only show models and model columns that are documented in
YAMLfiles.
Metadata
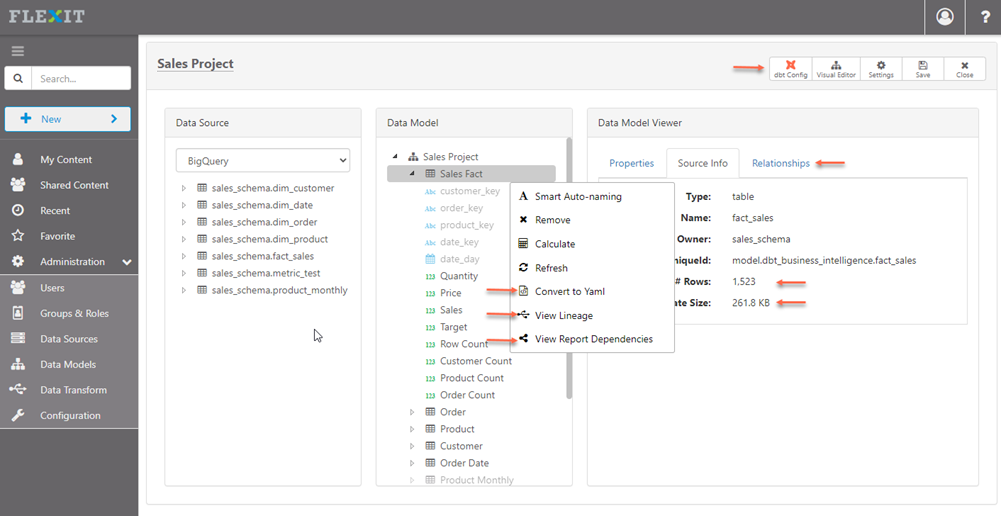
Once you've connected to a dbt project, you'll be in the FlexIt editor with all the dbt metadata automatically populated. If you selected Real-time Connection for your dbt config, then you cannot make changes in the editor (see more about this in Connecting to dbt). Explore your metadata model and Save when you are ready to create analyses. After saving, you can give access to the metadata model to specific users, groups, and roles.
The screenshot below of the metadata editor has orange arrows pointing to dbt-specific features.
Reports and Dashboards
Once you've saved your Metadata, you can create new reports and dashboards, or load samples.
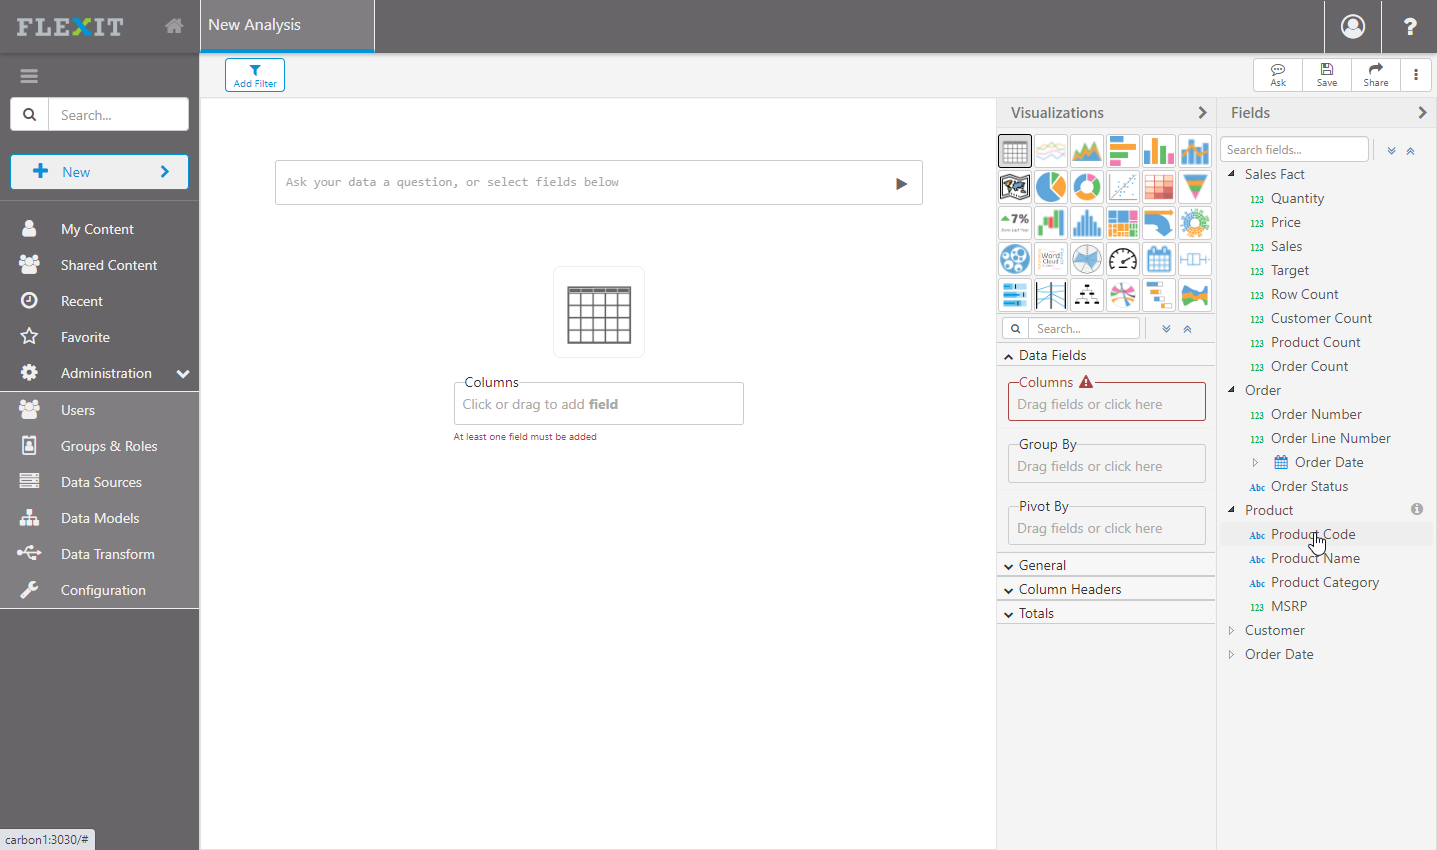
Create New
To create a new analysis from your dbt metadata, click on New in the top-left and select New Analysis. Select the data model that you created in Metadata above, and then you'll see a blank report ready to drag-and-drop fields from the right.
Samples
If you used the Example dbt Project from above, then you can load pre-built samples from FlexIt:
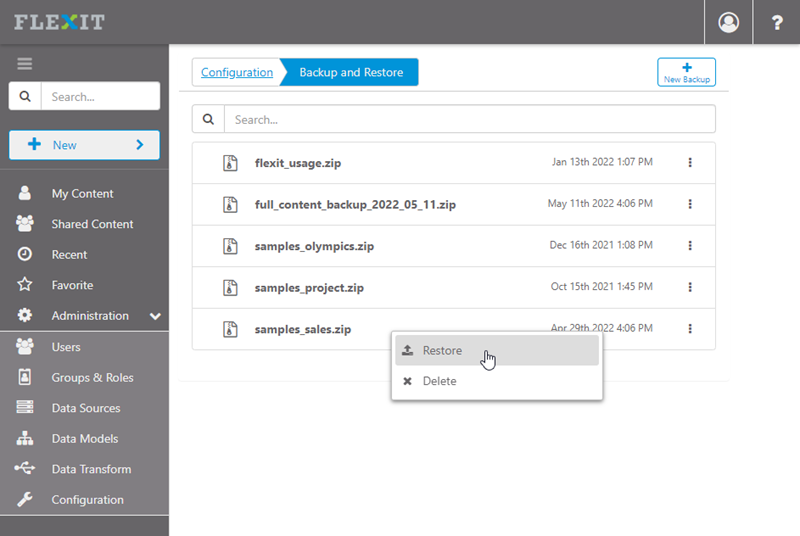
Navigate to "Administration > Configuration > Backup and Restore"
Right-click and "Restore" the samples_sales.zip item
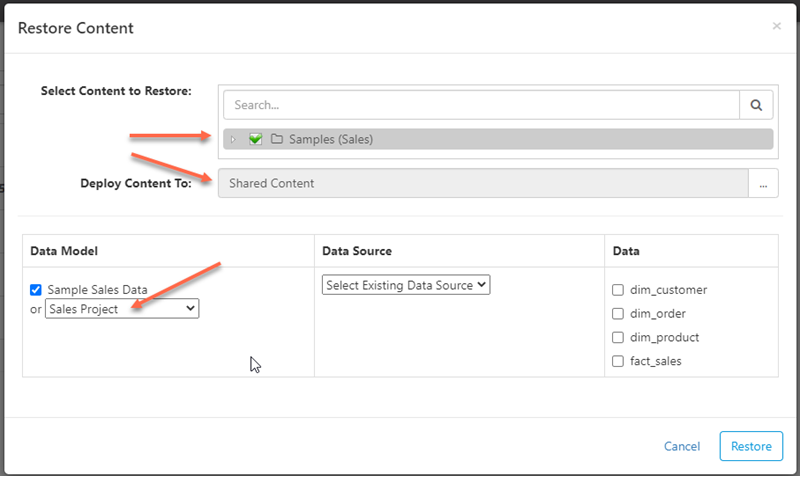
Check the "Samples (Sales)" content to restore, deploy content to "Shared Content", select the data model that you created in Metadata above, and click Restore
Navigate to the "Shared Content > Samples (Sales)" folder and take a look at the reports and dashboards
Concepts and Standards
Now that you've tried everything out with the sample project and reports, let's dive into the concepts
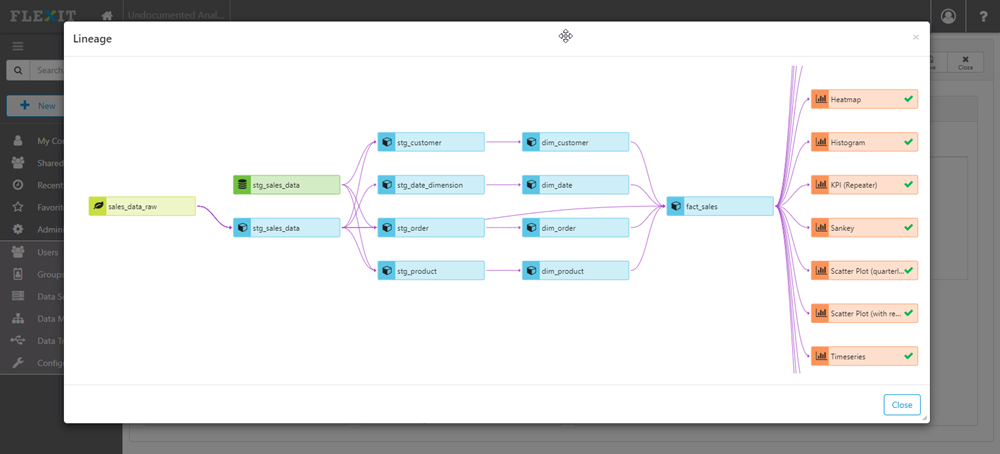
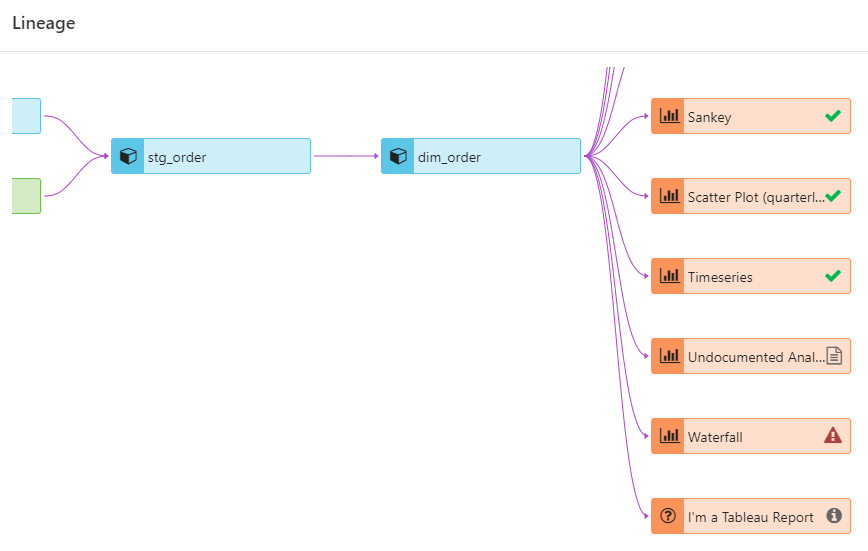
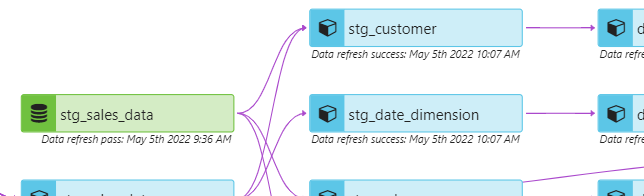
Data Lineage
FlexIt leverages the lineage feature of dbt to show both upstream model dependencies, as well as downstream dashboards and reports. In addition to lineage paths, it shows model, source, and seed refresh times and tooltip descriptions. For downstream exposures, it notifies users if the documented exposures are out of sync with the actual exposures.
Exposures
Model exposures
FlexIt tracks report and dashboard exposures in real-time to show you status
- OK - exposure is in both FlexIt and dbt
- Broken - exposure is documented in dbt but does not exist in FlexIt
- Info - exposure is in an external tool, not FlexIt
- Needs Doc - FlexIt report is not documented as an exposure in dbt
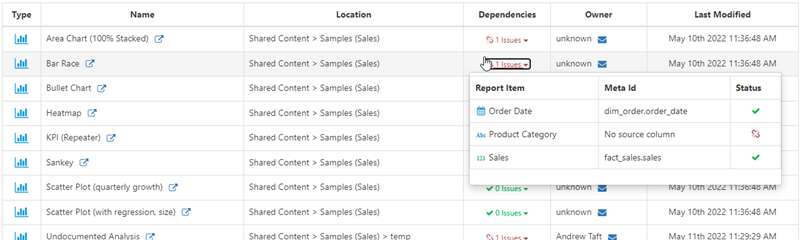
Column-level exposures
FlexIt also shows column-level exposures for FlexIt reports and dashboards. The screenshot below shows reports with their dependent columns, as well as if there are any issues such as broken links (e.g. a model column does not exist).
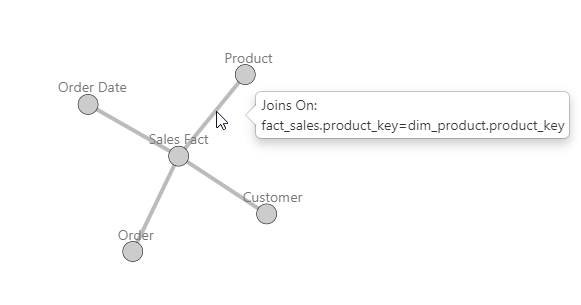
Joins (Entity Relationships)
Create relationships (joins) between models one of two ways in the dbt schema.yml model definition:
- Using the
tests.relationshipsproperty on dbt model columns, which also checks integrity - Using the
meta.joinsproperty in the dbt model
Relationships defined in the model YAML will appear in FlexIt as shown below
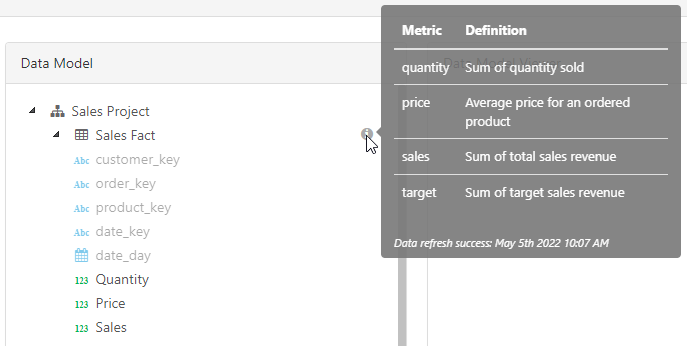
Metrics
Metrics (aka measures or facts) are numeric values summarized by dimensions. Metrics can be defined in the dbt schema.yml using the dbt metrics tag or model columns meta tag.
dbt metrics tag
Use the dbt metrics tag as defined in the dbt documentation, like this:
The dbt
metricstag approach is preferred since it is a dbt standard definition
dbt meta tag
You can also use the custom dbt meta tag, shown below.
Data freshness
In reports or dashboards, users can be aware of data freshness for models and sources throughout the full lineage. The screenshot below shows a source with a status of pass and timestamp, as well as the model run status of success and timestamp. If source freshness fails, or models in a run do not succeed, users will be notified of the status.
Data dictionary (Docs)
All dbt descriptions in models, columns, metrics, sources, seeds, and more are displayed in FlexIt tooltips. Use markdown in descriptions or Docs Blocks to enable rich html tooltips in FlexIt.
The model description that references the docs block markdown will enable the following tooltip in FlexIt:
Statistics
Information such as Number of rows or Size of a table/model can be very informative and build trust in the data. If the underlying data source supports these statistics, then FlexIt makes them available by right-clicking on any model in an analysis.

Custom meta
Many dbt features inherently support the needs of business intelligence, for example:
relationshipstest for integrity also enable joins- Metrics define facts for aggregation
- Descriptions and docs blocks support data literacy through explanatory tooltips
- Lineage enables data literacy and trust
- Exposures keep everything in working order and enable trust
- Freshness enables trust in letting the users know when there are issues with the underlying data
However, there are many features that are specific to business intelligence, and thus not inherently supported through standard dbt features. This is where the meta tag comes in, allowing us to define custom attributes for models, columns, metrics, and more.
Formatting
Define column formatting for numbers, dates, currency, and text
Depending on type, possible attributes are:
- decimalPlaces
- prefix
- suffix
- displayUnits
- showNullAs
- pattern (date only)
- divideBy100 (percent only)
Synonyms (Aliases)
Use meta synonyms when you want to assign multiple potential names to a single column. For example, sales might be called revenue, receipts, proceeds, or other names depending on who you ask. Synonyms allow you to define multiple aliases for a column that can be used for both search and Natural Language Query (NLQ)
Defining synonyms in your model schema.yml allows them to be search and used for Natural Language Query, as shown below:

Business (Friendly) Name
Use meta label on models and model columns to give them business friendly names.
Metrics have a
labelattribute, so do not usemeta.labelfor metrics
Model Order
Use the display_index meta tag to place models and columns in a specific order
Hidden
Use the meta.hidden attribute on models, model columns, and metrics to hide it from being displayed to end users in the BI tool.
Joins
For one-to-one inner joins where all rows have values for the joining columns, it is recommended that you use the column relationships tests so that you get the benefit of testing integrity and automated joins. However, when this is not possible, or you have a more complex join need, then you can use the model meta tag to define joins.
See the Joins (Entity Relationships) section.
Here is an example of defining joins using the meta.joins attribute:
Time Interval (Grain)
Use the meta.grain model column attribute to define default time granularity for a field. Set it to off to show only the original value of a field without the ability to have specific time grains.
When grain is not off, users will see the following grain options in the FlexIt metadata:

Grain only applies to date columns
Hosting dbt Docs
You can host the dbt Docs that are created after running dbt docs generate on the FlexIt server. Copy the dbt target folder to the FlexIt webcontent folder and then access the docs with the following URL format: http://flexitserver/webcontent/target. You can rename the target folder anything you want, changing the url as well.
Now you can connect FlexIt to the dbt Docs server