Data Transformation (ETL)
Overview
The data transformation feature can be used to Extract, Transform, and Load (ETL) data from one place to another. Data flows make it easy to pull data from many different sources of data in order to cleanse, validate, transform, and integrate data into a wide array of databases.
Getting Started
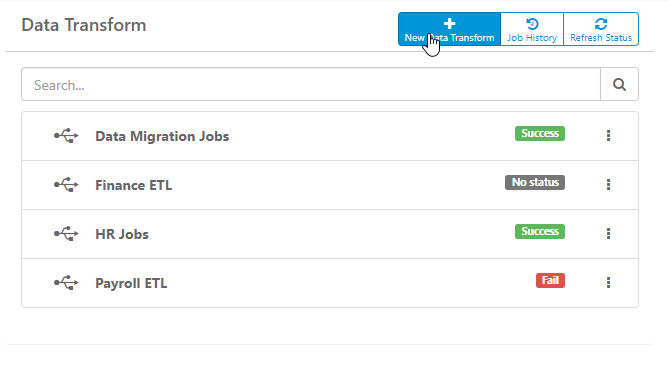
From the Administration > Data Transform list, click on an existing transformation or New Data Transform at the top. This will bring you into the design process for a data transformation. Use the tools and design panel to create your transformation process.
Tools
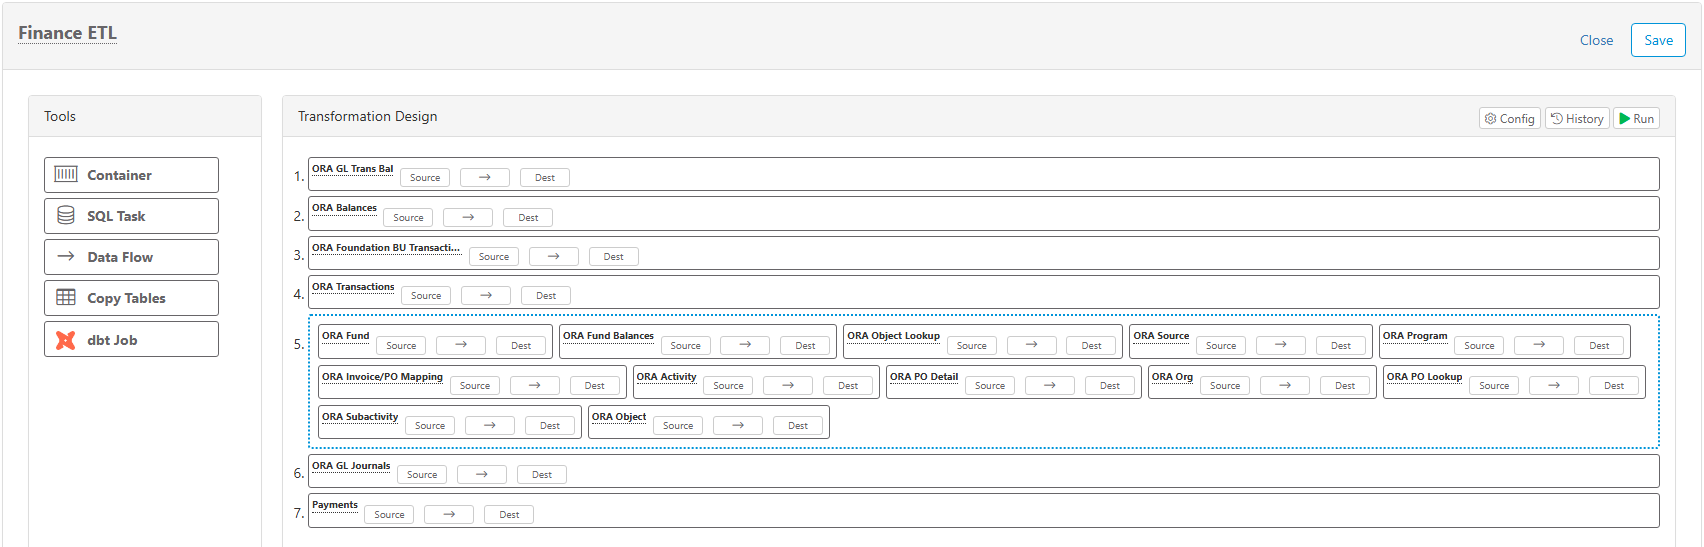
There are five simple tools you can use to design your transformation:
- Container - holds any of the tasks below and executes them concurrently (in parallel). Items not in a container will be run sequentially
- SQL Task - execute a SQL statment
- Data Flow - move data from a source (table, query, etc) to destination (table, SFTP, SSH)
- Data Ingestion - bulk ingestion of tables and other objects from databases or API's with streaming capabilities and more
- dbt Job - run a dbt Cloud or dbt-core job
To use these tool widgets, drag-and-drop any of the widgets from the Tools panel into the Transformation Design panel. The number order of the tasks will be the order that they are processed.
Right-click on any of the tools to access a menu of options:
- Run - run only the selected item
- Disable - disable the selected item from running when the entire job is ran
- Clone - make a copy of the selected item
- Delete - delete the selected item
- Actions - perform actions based on the result when the item is ran. See more about Actions below.
- Parameters - set variable parameters based on source results and use them in downstream extracts. See more about Parameters below.
Container
Containers can hold SQL Tasks, Data Flows, Data Ingestion, or dbt Jobs, which will appear inside the blue dotted border of the container. Everything inside a container will execute in parallel (i.e. synchronous).
SQL Task
Use SQL tasks to execute any SQL command. This is commonly used to set database settings or build custom insert/update/delete (CRUD) statements. You can use parameters and functions in SQL Tasks.
Data Flow
Data flow tasks are used to extract data from a source and load it into a destination. They appear with a name/label and three buttons for editing the source, mapping, and destination.

Name
To change the name/description to something unique, simply click the "Data Flow" text and enter a name.
Source
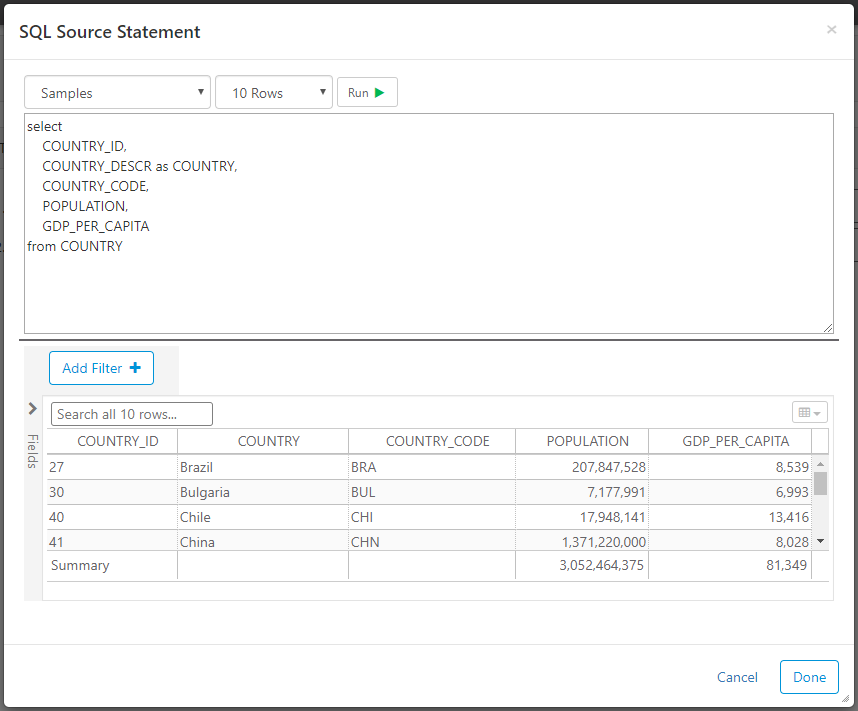
Data transform sources extract data from configured data sources. The drop-down list in the top-left shows existing data sources and also allows you to create a new data source by selecting Add New. The "# Rows" drop-down will limit the number of rows returned, allowing you to more efficiently test the SQL and set the columns. The limit is only applied for testing in this window, but does not apply when the transformation is ran later. You can use parameters and functions in source queries.
Click the Run button to test and verify your SQL and/or data results.
Important - You must "Run" the source if you want to do column mapping
Column Mapping
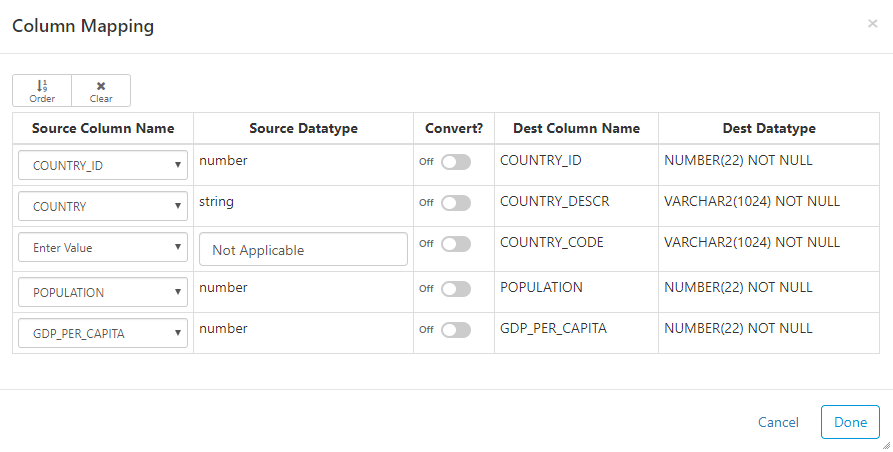
Click on the arrow to map the source columns to destination columns.
Important - if you do not map the columns, the natural order of the source and destination will be used.
Here are the main options for mapping:
- Order button: automatically map all the columns based on the order of the columns from the source
- Name button: automatically map all the columns based on the name of the source and dest columns
- Clear button: remove all existing mappings
- Convert: convert data type from source type into destination type
- Enter Value: manually enter a value as a source column by setting the Source Column Name to "Enter Value"
Destination
Configuring the destination allows you to set the table that you would like to load source data into.
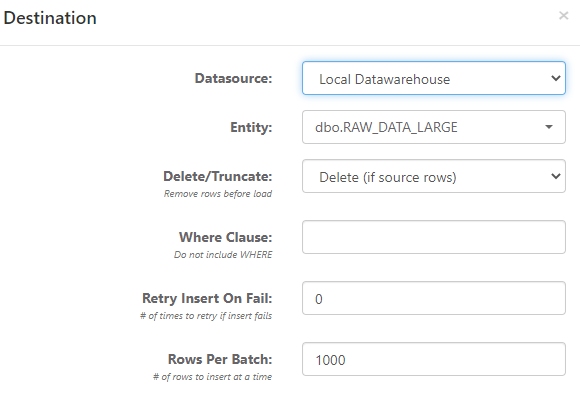
- Datasource - the destination data source connection
- Entity - the destination table to load data into
- Delete/Truncate - Options for Do not truncate, Truncate, Truncate (if source rows), Delete, and Delete (if source rows). If you select the "if source rows" option, it only delete/truncates when the source query returns rows. Delete will give you an option to include a Where Clause, which can use parameters and functions.
- Retry Insert On Fail - in some instances (e.g. connectivity is unstable), a load can be retried if it fails the first time.
- Rows Per Batch - number of rows to insert at a time.
- Quick Mode - If the source and destination database are the same, then an additional "Quick Mode" option is available. This executes the
insert into [DEST] select cols from [SOURCE]statement rather than chunking data, which is typically much faster.
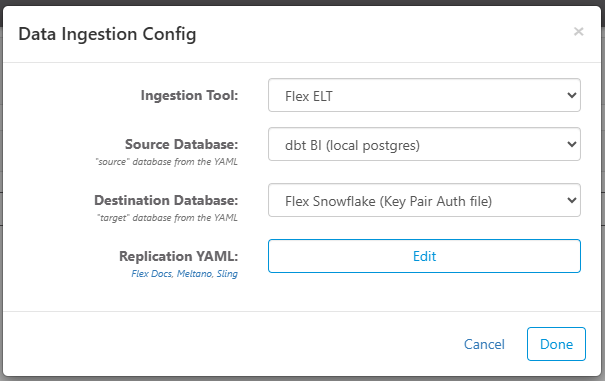
Data Ingestion
Set up advanced ingestion to bulk copy tables and other objects from databases and API's with streaming capabilities and more. Integrations with Meltano, dlt (Data Load Tool), SlingData, and more give you advanced capabilities with configuration in a YAML definition.
See the Data Ingestion docs for more details.
dbt Job
Run dbt Cloud or dbt-core jobs.
Functions
Built-in functions give you the ability to specify dates, years, months, etc. in the past or future. The functions must be enclosed in double brackets, and accept arguments to add/reduce by days/months/years or to format dates. For example, a function to get yesterday would be [[today,-1]]. Here are the available functions, where n is an integer and patterns are allowed:
- today - [[today, n, pattern]] - returns today's date +/- n days. Default pattern is mm/dd/yyyy, or use any here. e.g. [[today, -30, yyyy-mm-dd]].
- year - [[year, n]] - returns the current year in yyyy format +/- n years.
- fiscal_year - [[fiscal_year, n]] - returns the current fiscal year, starting on July 1.
- month - [[month, n]] - returns the current month as an integer. Use +/- to specify months in the past or future.
- fiscal_month - [[fiscal_month, n]] - returns the current fiscal month as an integer, where July is 1 and June is 12.
Parameters
Right-click on any SQL or Data Flow task to add parameters. Parameter values will be based on the source query. For example, if you add parameters to a task with "select HOST_YEAR, HOST_CITY from GAMES" as the query, then you can create parameter names for the HOST_YEAR and HOST_CITY columns, as such:

Once you've created parameters, you can use them in the destination DELETE where clause or any downstream SQL Source by enclosing the parameter name inside double brackets with an @ character. If the SQL source that sets the parameter returns multiple values, the parameter value will be a comma separated list of these values. Using the example above, you can use the pHostYear parameter like this:
Actions
Perform actions on SQL or Data Flow tasks based on run results.
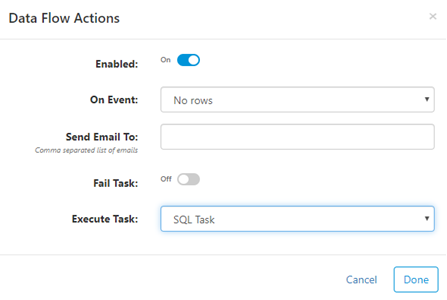
- Enabled - when on, actions will be executed if "On Event" criteria are met
- On Event - criteria for when action will be executed
- Send Email To - if criteria met, send email to a comma separated list of email addresses
- Fail Task - if criteria met, fail the task
- Execute Task - if criteria met, execute the selected task next. Actions can execute tasks that are disabled.
Configure (Settings)
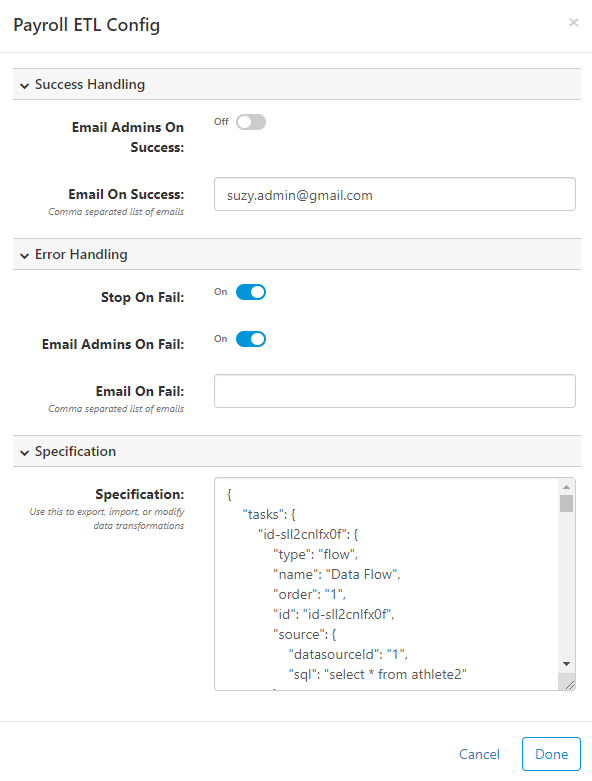
While designing an ETL process, you can click on  in the top-right to open the configuration properties. There are three main areas:
- Success Handling - configuration for what to do when the job runs successfully. Email Admins on Success will send an email to all FlexIt users in the Admin role. Email on Success allows you to enter comma separated email addresses that might differ from the admins. An SMTP email server must be configured (show me).
- Error Handling - similar to Success Handling, but also has an option for Stop on Fail. This stops the job immediately if any task fails. If this is not checked, individual task failures will still result in a successful job run.
- Specification - this is the text specification for the current job. This can be used to import/export jobs, which is useful for backups or migrating a job from one environment to another. The specification is in JSON format.
Run
There are a few ways to run ETL jobs and tasks.
Interactive
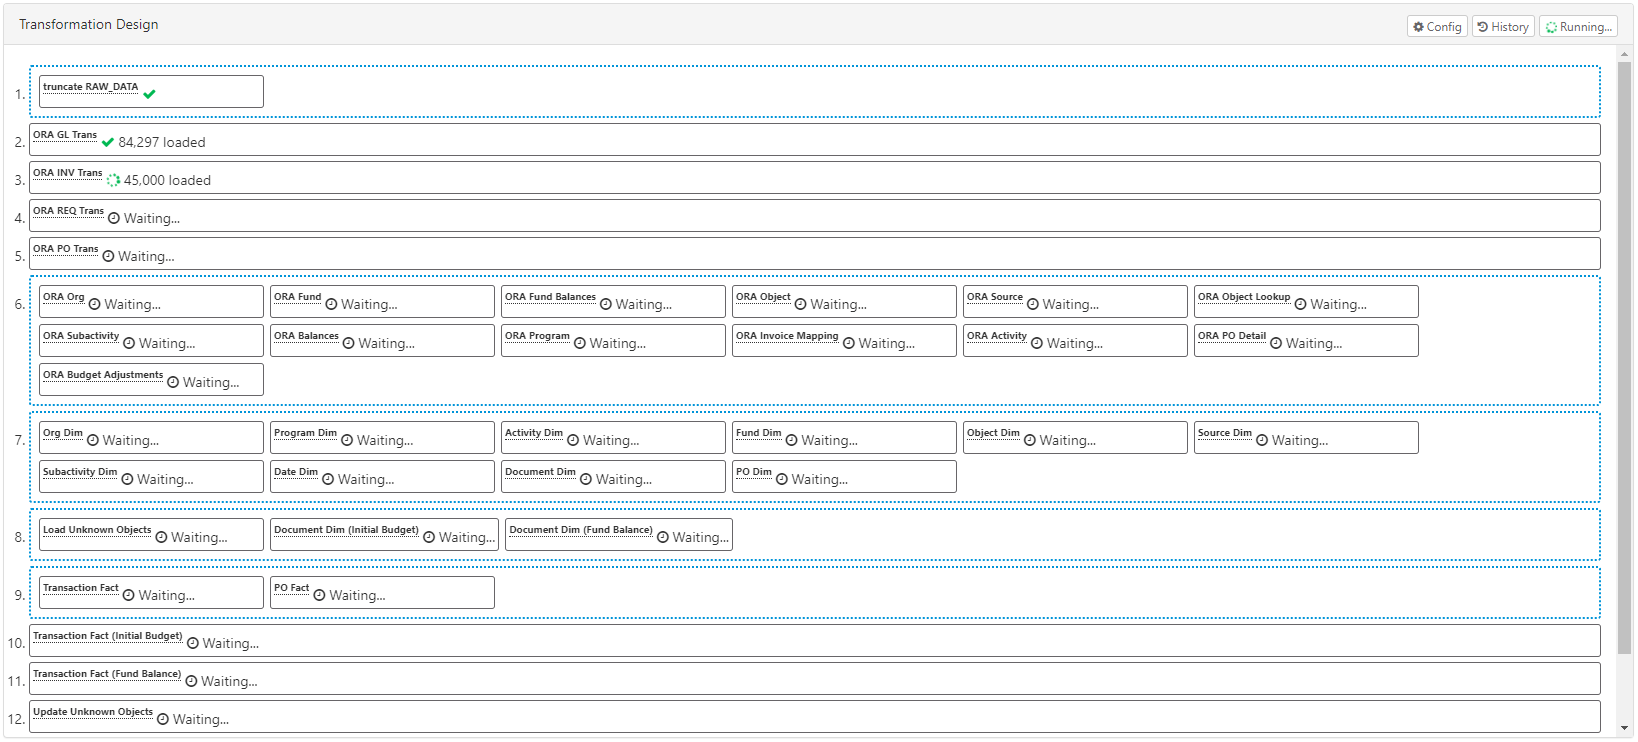
Interactive mode allows you to run the entire job or individual tasks with real-time updates on status, rows loaded, etc. You can run individual Data Flow tasks by right-clicking on them in the design pane and selecting Run. The entire job can be run by clicking on the Run button in the top-right. Both of these will immediately run the tasks and show results in your browser, as shown here:
Background
Background mode allows you to run the job in the background, either immediately or scheduled for later. To run the background job, go to the list of jobs and click on the ellipsis:
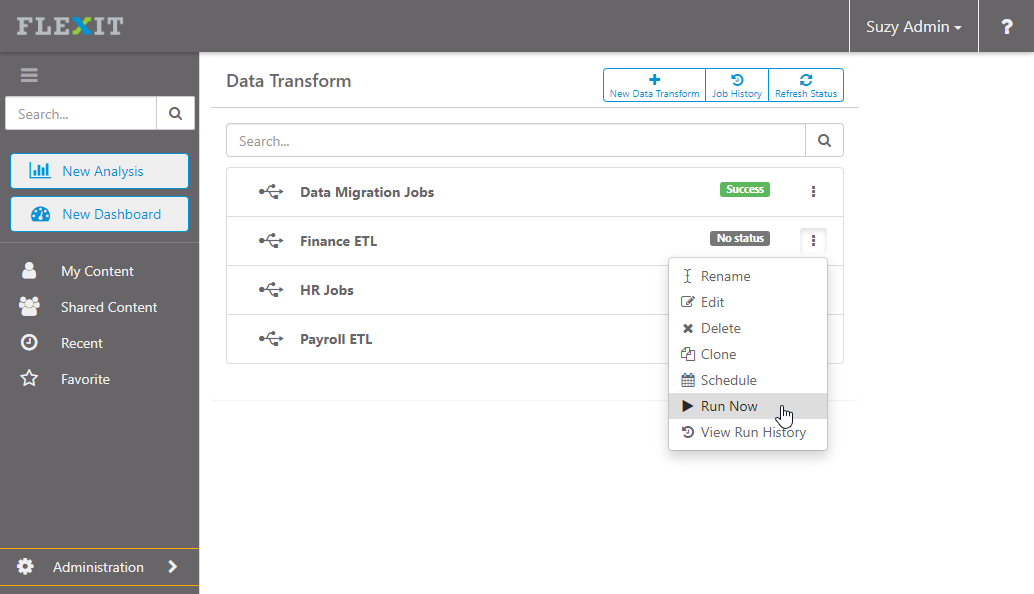
- Run Now starts the job immediately and runs it in the background
- Schedule allows you to set a date/time in the future to run the job (show me)
External Job Scheduler
You can start FlexIt ETL jobs from an external job scheduler such as JAMS or any 3rd party software that can execute a binary/executable, such as Windows Task Manager.
To start a job, run the flexit binary located in the [flexit_home]\bin folder with the runJob -jobId job_id arguments. job_id is the ID of the Data Transform etl job, which is the last number in the URL when you have the Data Transform open. For example, if the URL is https://flexitserver:443/#datatransforms/123, then the jobId is 123.
runJob Arguments
- jobId: the Id of the ETL job
- showMessages: include this argument if you want to see detailed messages
Make sure you run the
flexitbinary as administrator, otherwise you may get an connect EPERM error.
History
History shows the status and detail of jobs. To show a history for all jobs, click the Job History button at the top of the jobs list page. To show the history for an individual job, there are two methods:
- In design mode, click on the
 button.
 - From the jobs list, click on the ellipsis and select History
Schedule
Jobs can be scheduled to run at a specific time in the future with a recurring pattern. To schedule a job, click the ellipsis to the right of the job and select Schedule.
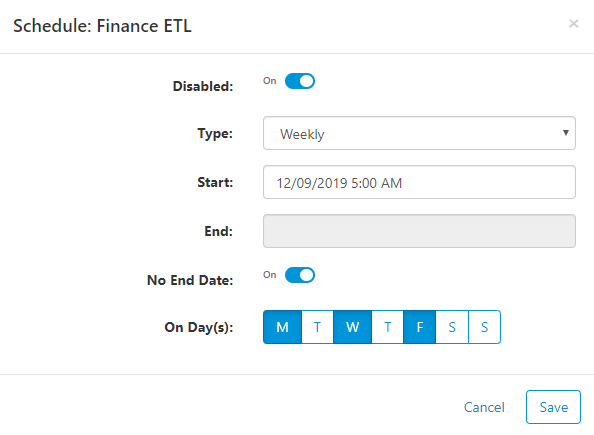
Enter properties to fit your scheduling needs:
- Disabled - click this in order to disable the job. The schedule will not be run when disabled, but it will still be available for you to enable later.
- Type
- Daily - run every day at a specific time
- Weekly - run weekly on selected days and times
- Monthly - run monthly, e.g. on the 1st day of the month, on the first Monday of the month, etc.
- Cron Format - if none of the above options work, then cron format allows you to create any type of pattern possible (see how)
- Start - date to start the scheduled job
- End - last date the job will be scheduled to run. Click No End Date below to run forever
- No End Date - click this to have the job run forever
SSH/SFTP Destination
In order to load data directly to a SFTP or SSH location, first set up a new SSH/SFTP Data Source connection. Then, set up a Data Flow task and use the SSH/SFTP data source as the destination.
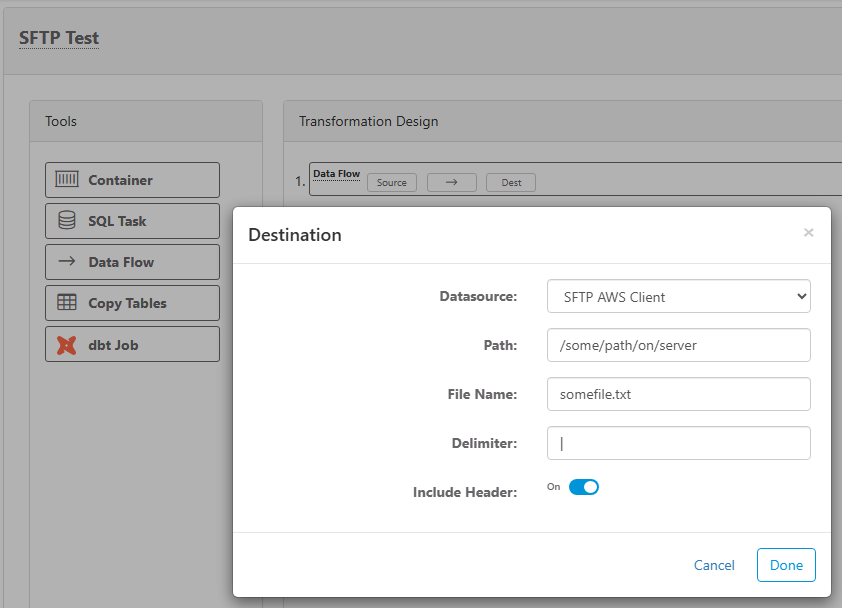
Enter properties for the SSH/SFTP file transfer:
- Datasource - the SSH/SFTP data source connection that you want to put the file on.
- Path - the folder path on the SSH/SFTP server. Do not put file name here.
- File Name - file name and extension/type
- Delimiter - if the source query has multiple columns, the delimeter will be placed between each column. Leave blank for no delimiter, or put the delimeter of choice (e.g. comma, pipe, etc.)
- Include Header - check this if you want to include a header row in the destination file
Clone (Backup)
Cloning a data transformation is an easy way to copy the transformation. This can be useful to save backups or create a new transformation from an existing one. In order to clone, go to the list of all data transformations, click on the ellipsis to the right of the transformation, and select Clone.
Tip - there are a couple other ways to back up data transformations:
- Copy the specification from the transformation Configuration and save in a text file
- Create a backup using the Admin > Config > Backup and Restore feature
Extract Data from Oracle BI
You can use Oracle BI (OBIEE) as a source to extract data from. Source data can come from either an existing Oracle BI report or a Logical SQL statement.
Loop - Oracle BI may be configured with a limit to the number of rows that a report or Logical SQL statement can return, or the load might cause Oracle BI to fail. In this case, you can use the Looper feature to send multiple smaller requests for data instead of one large request. See the documentation below for instructions on using the looper with either Logical SQL or a report.
Logical SQL Source
Logical SQL Syntax
Reference Guide: https://docs.oracle.com/middleware/12212/biee/BIESQ/toc.htm
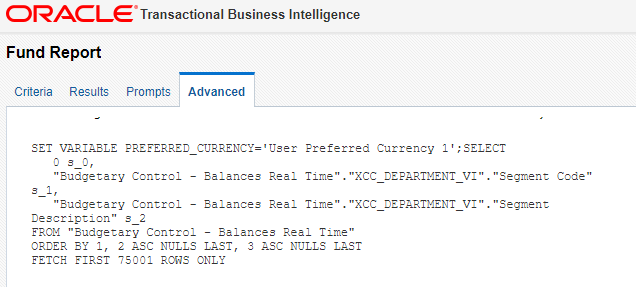
Logical SQL must adhere to the Oracle BI syntax. You can get the Logical SQL for a report from the Advanced tab, shown here:
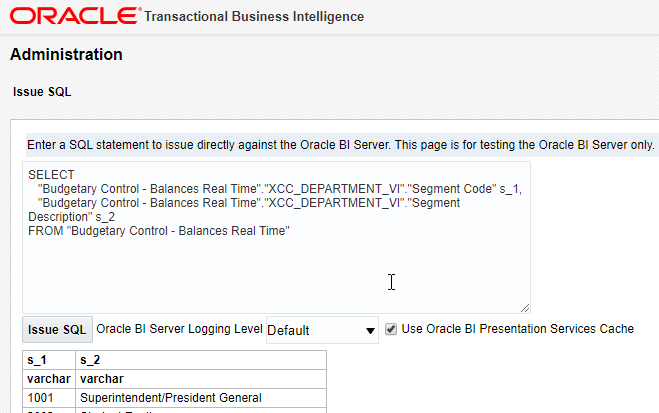
You can test run the Logical SQL from Oracle BI administration. Click on Administration in the top-right, click Issue SQL under Maintenance and Troubleshooting, enter your SQL and click Issue SQL.
Logical SQL Looper
The Logical SQL looper will send multiple smaller requests to the Oracle BI server for data. To use the looper, enclose the list of items in the SQL WHERE clause in double curly braces.
For example, in ('0000','0100') becomes in ({{'0000','0100'}}), like this Logical SQL statement:
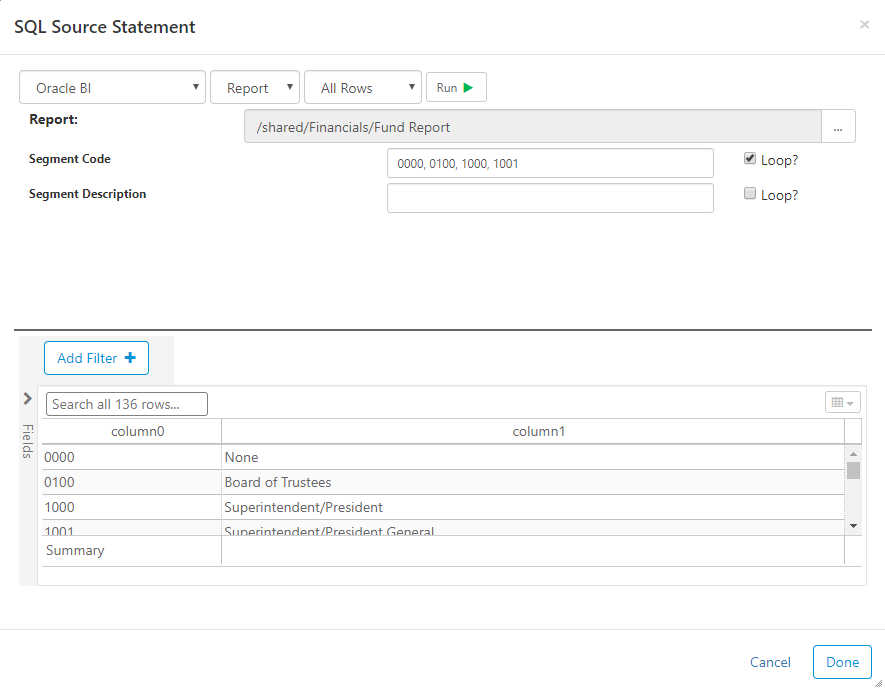
Report Source
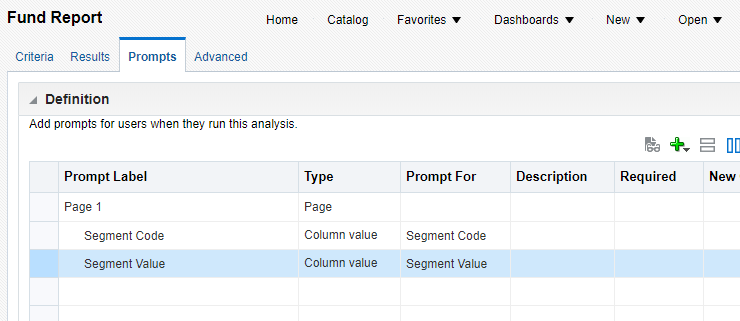
You can select an existing report to extract source data. If the selected report has parameters (i.e. prompts), then you can enter values into the input next to the prompts.
Looper - if there is a limit to the number of rows a report can return, you can use the "Loop" feature. Clicking the loop checkbox sends multiple smaller requests for the data. The example below will send four separate requests to get the data for all four Segment Codes.
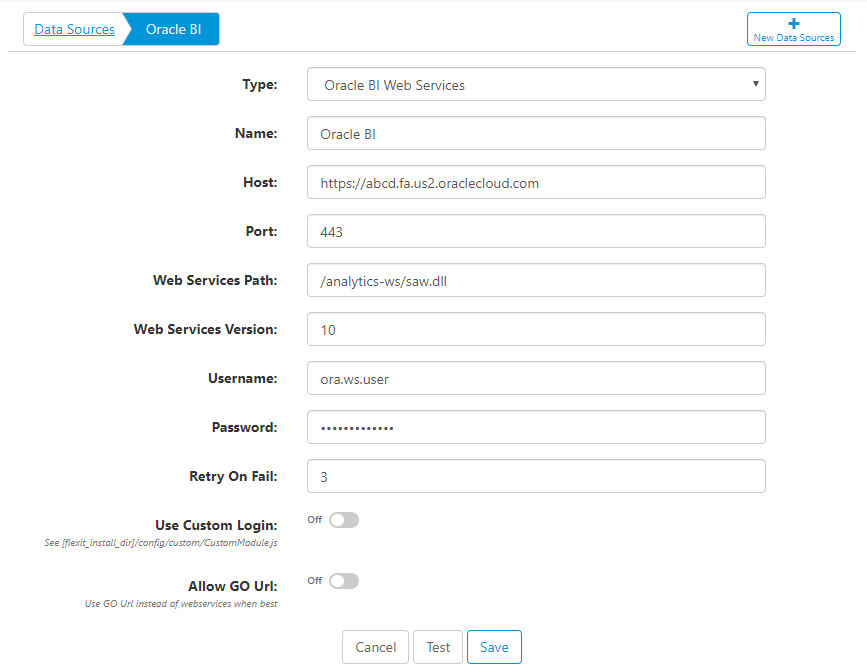
Connecting to Oracle BI
Connect to Oracle BI by creating a new Data Source. Similar to other data sources, you give the connection a name and enter a host and port.
- Web Services Path - defaults to /analytics-ws/saw.dll
- Web Services Version - enter the version that your Oracle BI installation is using. You can typically verify the web services version by going to the full URL and typing ?wsdl at the end. For example, https://abcd.fa.us2.oraclecloud.com/analytics-ws/saw.dll?wsdl.
- Username - enter a username to connect with. It's good practice to use a system account here, if possible.
- Retry on Fail - if a connection fails, retry n times. Oracle BI web service requests often fail for no apparent reason. This setting can help mitigate the issue by retrying the request if it initially fails.
- Use Custom Login - if two-factor (2FA) or multi-factor authentication (MFA) are used, you may need to use a custom login script. This setting allows you to use the Node JS script [flexit_home]/config/custom/CustomModule.js to properly authenticate and allow access to web services and/or the Oracle GO Url. This process uses the Selenium Web Driver, a widely-used and secure tool.
- Allow GO Url - in some cases, the Oracle BI GO Url can be faster and more reliable than the Oracle web services. Enable this setting to allow FlexIt to choose which method to use, with the goal of increasing performance and reliability.
Extract Data from PeopleSoft Query
You can use PeopleSoft Query as a source to extract data. Set up a connection to PeopleSoft Query, then choose the query as you would any other ETL data source for either SQL or Data Flow tasks.
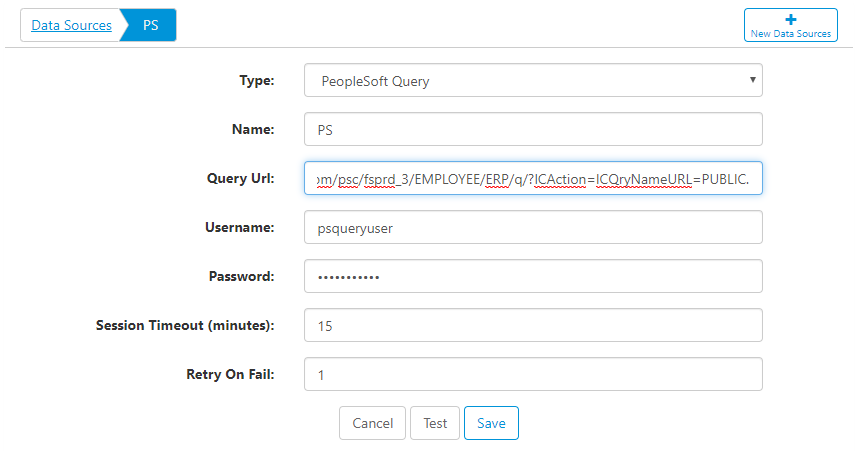
Connecting to PeopleSoft Query
Connect to PeopleSoft Query by creating a new Data Source. Here are the data source properties:
- Query URL - this will be the base URL for the query. The URL should contain everything except for the actual query name, which will be plugged in from individual ETL tasks.
- Username - enter a username to connect with. It's good practice to use a system account here, if possible.
- Password - enter the password to connect with. This is encrypted with the most advanced encryption methodologies.
- Session Timeout (minutes) - leave the connection open for the specified time, in minutes.
- Retry on Fail - if a connection fails, retry n times.
Note - this process uses the Selenium Web Driver, a widely-used and secure tool. You'll need to provide a custom script on the FlexIt server under [flexit_home]/config/custom/PSQuery.js to properly authenticate and allow access to PeopleSoft environment.
Query Source
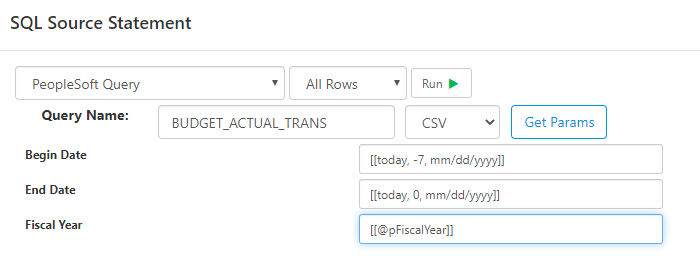
Once you've created the connection, PeopleSoft Query data can be extracted using SQL or Data Flow tasks. Select the PeopleSoft Query data source and enter the Query Name.
Click Get Params to pull the Query report parameters without running the query
Click Run to execute the query and fetch data. You can specify the output type from the PeopleSoft Query as either CSV or XML.
You can use both parameters and functions in any of the parameter inputs